AN ATTACHED TICK! HOW TO REMOVE IT THE RIGHT WAY
By Chris Williams on July 12, 2018.
Picture it. Two sets of hooks, each with three barbed fingers pushing in and pulling, swimming into your skin in a sort of breaststroke to get a good purchase. This is how a tick’s mouthparts work. These backward-facing teeth have been described as mini-harpoons or looking like a chainsaw. Once the barbed mouthparts are securely in, they’re in to stay, unlike a mosquito’s blood-sucking mouthparts that easily slide in and out for a quick getaway.
This is why you can’t just flick an attached tick off of your skin, and why if you simply yank a tick out, you run the very real possibility of removing the body and leaving those barbed mouthparts behind. Experts now say this isn’t such a big deal since mouthparts alone can’t transmit disease and they will eventually work their way out of your skin like a splinter would.
DON’T DELAY IN REMOVING A TICK
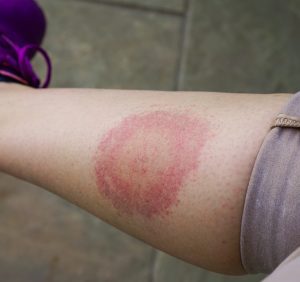
Bullseye rash typical of Lyme Disease. Shutterstock.
The most important step is to remove a tick as soon as it’s discovered (and you should be conducting regular checks) since an infected tick’s ability to pass on Lyme disease or some other disease depends for the most part on how long it is attached. Ticks usually must remain attached for at least 24 hours before they can transmit Lyme. That’s not much time and since you rarely know exactly when that tick attached, the sooner you remove it, the better. Without intervention, a tick will typically remain attached for 3 to 10 days to suck up enough blood to provide energy for it to molt to the next stage.
HOW TO GET THAT BLOOD-SUCKING PARASITE OUT!
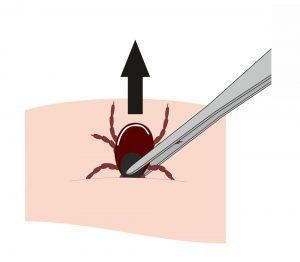
Illustration of mechanical removal. Shutterstock.
Removing an attached tick isn’t rocket science and doesn’t require medical intervention unless it’s in an “inaccessible” location and you don’t have any close friends. In that case, don’t be embarrassed to get medical help because you need to get that tick out.
For the removal process, you simply need a pair of tweezers, fine-pointed is best. Grab the tick as close as you can to the skin and its imbedded mouthparts, not in the middle of its body. You want to pull at the attachment point. Then slowly and evenly pull straight up until the tick is freed. You may be inclined to pull the tick out at a backwards angle, but trust the experts, straight up and out works best.
After removal, it’s a good idea to swab the bite area with alcohol to help prevent infection, especially if mouthparts may be left behind. It’s also a good idea to save the tick in a vial of alcohol with the date of removal written down so that if disease symptoms appear days or weeks later, you can have the tick identified.
The best way to prevent attached ticks this summer and fall is to keep them off of you in the first place. Check out these Colonial blogs for tick prevention tips: